sigmoid

..oo..oo..oo..oo..oo..oo..

Browsing Posts published by stathis

If you have a Windows 7 computers on different subnets, as I do, you may want to enable sharing files between them and this involves enabling file sharing across different subnets.

The setup I will use as an example is pretty simplistic:

Assume that you have a router with an ethernet-based LAN which is configured as subnet 192.168.77.xx, and a Wifi-based network interface that uses the subnet 192.168.99.xx. Lets now consider that you connect a Windows 7 computer via ethernet on your LAN and a Windows 7 laptop connects to your Wifi. Attempting to see filesystem shares between these two computers will most likely fail. This is because of the default firewall rules of Windows 7. To ensure the problem is related to the Windows 7 firewall rules, just disable it on both computers and try to connect to each other. If this is successful, enable the firewall again and follow the instructions next. If you still cannot connect then the following is not going to help you and you should investigate your network configuration, connectivity, etc.

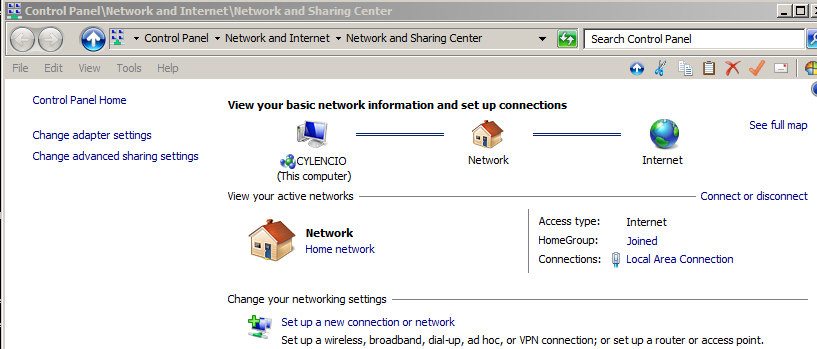
First figure out what type of network is the one you are connected to. You can find out by looking in: Control Panel > Network and Internet > Network and Sharing Center.

Network and Sharing Center showing a "Home network" configuration.

Network and Sharing Center showing a “Home network” configuration.

Look for “View your active networks”, it will have either of the following:

  • “Home network”, which means the network you are connecting to is Private in your firewall rules,
  • “Work network”, which means the network you are connecting to is Domain in your firewall rules,
  • “Public network”, which means the network you are connecting to is Public in your firewall rules.

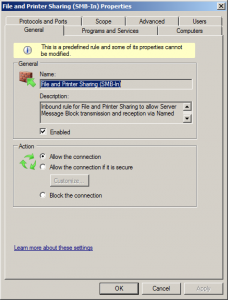
Next, open your Control Panel > System and Security > Windows Firewall > Advanced Settings and select the Inbound Rules. Then scroll down to “File and Printer Sharing (SMB-In)” and choose the profile that your network is in (Private, Public, Domain). Double-click (or right-click > Properties) to modify it. The window shown below will appear.

File and Printer Sharing Inbound Rules window.

File and Printer Sharing Inbound Rules window.

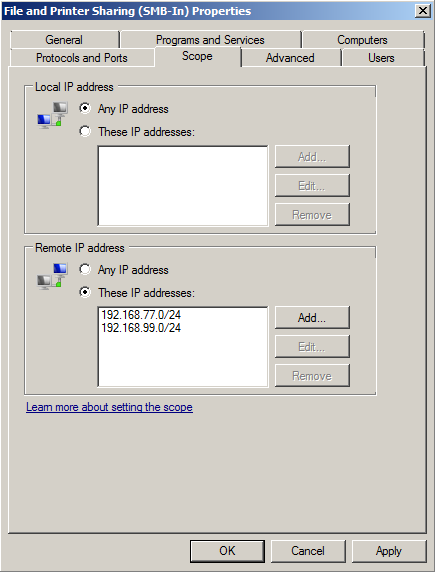
Switch to the “Scope” tab and look at the lower part of the tab, “Remote IP address”. Instead of the default “Any IP address”, choose “These IP addresses:” and press the button Add. Then under “This IP address or subnet” type in the first subnet: 192.168.77.0/24 and press OK, to add the one subnet. Repeat the process to add the second subnet 192.168.99.0/24.

The Scope tab of your Inbound Rule will look similar to the following Figure.

File and Printer Sharing (SMB-In) allowing two subnets

File and Printer Sharing (SMB-In) allowing two subnets

If you want to enable sharing over any network use the “Any IP address” option instead of inserting specific subnets. However, you should consider the implications of this since anyone will be able to see the sharing and potentially access it (depending on the permissions you set for it).
4+

I have already explained (very superficially) the motivation for the need of jumping directly into a directory from the Windows Explorer, while having the Visual Studio (VC++ actually) compiler and linker tools available for various architectures in my older post windows task: Open Visual C++ command prompt by right-clicking a folder.

I have now improved these methods, as it has become trickier to be able to compile software with Visual Studio 2008, 2010 and 2012 all in the same system.

Be advised that to use this method you will need Windows 7 and most likely Administrative rights also. I am using a registry feature that is not available on 2000, XP and Vista (as far as I know), so chances are you will need to tweak these scripts significantly to get a similar effect, but the principle idea of detecting what is installed on the system should be the same.

The script I wrote creates 2 Context Menus and one submenu entry for each Visual Studio Version available in your system. If a version of VS is not present an entry is not created. What you should see if you have all three versions of VS (2008, 2010, 2012), will be something like:

  • VS (32-bit), for 32-bit prompts.
    • VS2012 x86 Prompt
    • VS2010 x86 Prompt
    • VS2008 x86 Prompt
  • VS (64-bit), for 64-bit prompts.
    • VS2012 x64 Prompt
    • VS2010 x64 Prompt
    • VS2008 x64 Prompt

Right-clicking on a directory will show you something like this:

vsprompt-all-in-one

Feel free to download and use the batch file (vs-cmd-prompt-all-in-one.bat) that does all this.

You can find more information about creating Context Menu entries over at MS, see below in the References section, however be aware that the documentation is poor and some of the examples they are showing are both inconsistent as well as wrong.


Any feedback or bug reports are welcome.

References

0

Sometimes it is useful to “reset” the numbers of an auto-incrementing field in a MySQL table. This obviously is a VERY bad idea if you have relations to these indices, so make sure you know what you’re doing before executing this on your tables!

So, having warned you, here is the SQL code to do this:

SET @count = 0;
UPDATE IGNORE `table` SET `table`.`key_id` = @count:= @count + 1;

This may not work as you expect if you have a PRIMARY KEY in your table. One way to get around this is to turn the PRIMARY KEY into an INDEX, perform the counter reset and convert the INDEX back to a PRIMARY KEY again:

ALTER TABLE `table` DROP PRIMARY KEY , ADD INDEX ( `key_id` );
SET @count = 0;
UPDATE IGNORE `table` SET `table`.`key_id` = @count:= @count + 1;
ALTER TABLE `table` AUTO_INCREMENT = 1;
ALTER TABLE `table` DROP INDEX `key_id` , ADD PRIMARY KEY ( `key_id` );

If you know of an SQL statement that preserves relations and can resets the counters, then let me know.

0

I’ve been using Gentoo for many years now and although hardware has failed me several times, with anything from the motherboard to the hard drives going bad, I have managed to keep the same software and transplant it on new hardware with minimal effort each time. Some of my Gentoo servers have been updating and evolving via the portage system for nearly a decade.

Of course you should have on your system a few packages that are useful for system maintainance:

  • sys-apps/portage – most likely you have this already, as it provides emerge, emaint, elog, etc.
  • app-admin/perl-cleaner – provides perl-cleaner
  • app-admin/python-updater – provides python-updater
  • app-portage/gentoolkit – provides eclean, equery, revdep_rebuild

Apart from the typical portage syncing and emerging of updates, every once in a while (usually once per quarter), I run the following on my servers to keep things tidy:

perl-cleaner --reallyall
python-updater

emaint --check all

emaint --fix all

emerge --update --newuse --deep --with-bdeps=y @world

emerge --depclean

revdep-rebuild

eclean distfiles

There are plenty of cool tips on maintaining a Gentoo system on the references below.

MySQL/

mysql_upgrade -u root -p

mysql_upgrade invokes:

mysqlcheck -u root -p –all-databases


References

1+

[ATTENTION: These instructions are a personal reminder and you may follow them at your own risk!! I cannot be held responsible if you lose your data or your system becomes inaccessible.]

Sometimes it is not possible to physically access a linux server and go into single user mode to perform the conversion of a root filesystem from ext3 to an ext4 one. The strategy I follow is to disable just about everything on it, block access to incoming users, perform the changes on the filesystem and reboot.

First, alter the filesystem of your root partition (/) in /etc/fstab to ext4. The root filesystem is the partition with mount point /. For example, my fstab line looks like this:

/dev/sda1    /    ext3    defaults        0       0

I changed it to read:

/dev/sda1    /    ext4    defaults        0       0

Next determine which processes or services are writing on the root partition and stop them so you can perform the conversion. You would want to stop just about any services, except probably from sshd; that includes apache, mysql, samba, to name a few. As it may not be obvious what is writing on disk consider running the following command:

# fuser -v -m /

                     USER        PID ACCESS COMMAND
/:                   root     kernel mount /
                     root          1 .rce. init
                     root          2 .rc.. kthreadd
                     root          3 .rc.. ksoftirqd/0
                     root          5 .rc.. kworker/0:0H
                     ...
                     ...
                     ...
                     root       1854 .rc.. scsi_eh_3
                     root       2041 .rce. udevd
                     root       2042 .rce. udevd
                     root       2423 .rc.. flush-3:0
                     root       2429 Frce. dhclient
                     root       2587 .rce. syslog-ng
                     root       2588 Fr.e. syslog-ng
                     root       2619 .rce. sshd
                     root       3102 .rce. cron
                     root       3116 .rce. agetty
                     root       3117 .rce. agetty
                     root       3118 .rce. agetty
                     root       3119 .rce. agetty
                     root       3120 .rce. agetty
                     root       3121 .rce. agetty
                     root      15174 .rce. sshd
                     root      15179 .rce. bash
                     root      15194 .rc.. kworker/0:0

Scan the long list of processes fuser will give you for processes with ACCESS containing F and f, which denote open files. Stop the respective processes. In my case it is the dhclient process and the syslog-ng service that have to be stopped. The syslog-ng can be stopped on Gentoo using:

/etc/init.d/syslog-ng stop

while the dhclient can just be killed using its PID, with:

kill -9 2429

Double-check with fuser again that nothing is accessing the filesystem and now remount the root filesystem read-only:

# mount -o remount,ro /

Enable the ext4 features on the existing ext3 filesystem of the root filesystem:

# tune2fs -O extents,uninit_bg,dir_index /dev/sda1
tune2fs 1.42 (29-Nov-2011)

Then run fsck on the filesystem to fix up some on-disk structures that tune2fs has modified:

# e2fsck -fDC0 /dev/sda1 
e2fsck 1.42 (29-Nov-2011)
Pass 1: Checking inodes, blocks, and sizes
Pass 2: Checking directory structure                                           
Pass 3: Checking directory connectivity                                        
Pass 3A: Optimizing directories                                                
Pass 4: Checking reference counts                                              
Pass 5: Checking group summary information                                     
                                                                               
/dev/sa1: ***** FILE SYSTEM WAS MODIFIED *****
/dev/sda1: ***** REBOOT LINUX *****
/dev/sda1: 608861/4825088 files (5.5% non-contiguous), 13559414/19277992 blocks

If everything goes according to plan, just reboot the machine and your system will come up using ext4 as the filesystem of your root partition. You can try sync instead of rebooting your machine, but this may or may not work.

You can follow the same instructions to convert a non-root filesystem too, only this will be much easier, as you can just umount such partitions and perform the conversion steps.


References

0