sigmoid

..oo..oo..oo..oo..oo..oo..

Browsing Posts published by stathis

UPDATE [15 Nov 2013]: For the latest binaries visit my Precompiled Boost libraries dedicated page. Build scripts and instructions are also included.

These are my notes for building Boost with Boost.Python and Boost.Locale support for both Win32 and Win64 using MSVC 2010 Ultimate.

If you just want to use the pre-built libraries with Boost.Python (Python) and localization (ICU) support, but without spending hours compiling them yourself, you can just download them from the pre-built binaries page.

Preparation

The ICU Library (for Boost.Locale)

Download the latest source code of the ICU library.
The prebuilt binaries contain no Debug symbols. If you want to build them yourself, you will need the Source Code:

I use Cygwin/MSVC to build the ICU Library in all variants (debug/release) with static/shared linking. Find my prebuilt ICU Libraries and a how to DIY on my other post here.

Python (for Boost.Python)

Download the latest 2.x release of Python. Currently v2.7.6 is the latest version and can be found at:

You can extract the two files into convenient directories from the command line:

msiexec /a python-2.7.6.msi /qb TARGETDIR=I:\dev\python
msiexec /a python-2.7.6.amd64.msi /qb TARGETDIR=I:\dev\python64


Building Boost

Download Boost. I used release v1.49.0.
I now assume that you have the following layout (you should adjust your paths in the commands further below as appropriate):

         Bouse Sources in I:\tmp\boost-src
ICU (shared 32/64-bit) in I:\dev\icu-shared
ICU (static 32/64-bit) in I:\dev\icu-static
       Python (32-bit) in I:\dev\python
       Python (64-bit) in I:\dev\python64

I will be building Boost in the intermediate directory I:\tmp\boost-build, and I will install the resulting Boost libraries in I:\dev\boost for the 32-bit library, and I:\dev\boost64 for the 64-bit library. I prefer to have two separate boost directories, as this makes it easier to use with CMake. Remember to delete the build-dir (I:\tmp\boost-build) after you are done. It should save around 5GB for each of the 32- and 64-bit builds. Note also that I have a quad core CPU and therefore I will enable it (-j4) to build Boost faster, change this or remove it to reflect the capabilities of your CPU.

Building 32-bit Boost Libraries

Create a Boost Jam user configuration file: I:\tmp\boost-src\user-config.jam and add:

using python : 2.7 : I:\\dev\\python\\python.exe
  : I:\\dev\\python\\include
  : I:\\dev\\python\\libs
  : <address-model>32 ;

Open a 32-bit Visual Studio Command Prompt (2010):

%comspec% /k ""D:\dev\msvc2010\VC\vcvarsall.bat"" x86

To build Boost invoke the command:

bootstrap.bat
b2 -j4 -sICU_PATH=I:\dev\icu-static link=static ^
       --user-config=I:\tmp\boost-src\user-config.jam ^
       --prefix=I:\dev\boost ^
       --build-dir=I:\tmp\boost-build ^
       --toolset=msvc-10.0 ^
       --without-mpi ^
       --build-type=complete install ^
       --debug-configuration

If everything goes well you should see in the building output of boost:

...
    - has_icu builds           : yes
...
    - icu                      : yes
...

The above will build Boost static libraries. You can tweak the parameters e.g. -sICU_PATH=I:\dev\icu-shared link=shared to build Boost shared. These commands will build all libraries, except from Boost.Python. To built, you need to run the command again, with the very same options, expect replace --without-mpi, with --with-python, for example:

b2 -j4 -sICU_PATH=I:\dev\icu-static link=static ^
       --user-config=I:\tmp\boost-src\user-config.jam ^
       --prefix=I:\dev\boost ^
       --build-dir=I:\tmp\boost-build ^
       --toolset=msvc-10.0 address-model=32 ^
       --with-python ^
       --build-type=complete install ^
       --debug-configuration

Building 64-bit Boost Libraries

Edit the file: I:\tmp\boost-src\user-config64.jam and add:

using python : 2.7 : I:\\dev\\python64\\python.exe
  : I:\\dev\\python64\\include
  : I:\\dev\\python64\\libs
  : <address-model>64 ;

Open a 64-bit Visual Studio Command Prompt (2010):

%comspec% /k ""D:\dev\msvc2010\VC\vcvarsall.bat"" x64

To build Boost invoke the command:

bootstrap.bat
b2 -j4 -sICU_PATH=I:\dev\icu-static link=static ^
       --user-config=I:\tmp\boost-src\user-config.jam ^
       --prefix=I:\dev\boost64 ^
       --build-dir=I:\tmp\boost-build ^
       --toolset=msvc-10.0 address-model=64 ^
       --without-mpi ^
       --build-type=complete install ^
       --debug-configuration

Again, if everything goes well you should see in the building output of boost:

...
    - has_icu builds           : yes
...
    - icu (lib64)              : yes
...

Again, the above will build the 64-bit Boost static libraries. You can tweak the parameters e.g. -sICU_PATH=I:\dev\icu-shared link=shared to build Boost shared. These commands will build all libraries, except from Boost.Python. To built, you need to run the command again, with the very same options, expect replace --without-mpi, with --with-python, for example:

b2 -j4 -sICU_PATH=I:\dev\icu-static link=static ^
       --user-config=I:\tmp\boost-src\user-config64.jam ^
       --prefix=I:\dev\boost64 ^
       --build-dir=I:\tmp\boost-build ^
       --toolset=msvc-10.0 address-model=64 ^
       --with-python ^
       --build-type=complete install ^
       --debug-configuration


Download the produced binaries from the pre-built binaries page.

Note: I have not extensively tested the libraries and therefore if you are having trouble using them, please feel free to leave a comment.

0

I noticed that there are people trying to come up with a way to extract .tar.gz files in one go on Windows. For instance, I was reading: How can I unzip a .tar.gz in one step (using 7-Zip)? While on a unix system this is trivial, with 7-zip on Windows this becomes a two-step process. There are of course a lot of solutions to this on Windows. The way I prefer to do it on Windows 7, is to have a context menu on Windows Explorer, right-click and extract the file in one go.

You can download the Registry file I created right here: 7zip-extract-tar-gz.reg, use Save Link As to save it as a file, then double-click to import it into your registry: at your own risk of course!
You will also need to have the 7zip executables in your environment PATH for this to work.

To do this first create the context menu entry:

  • open the Registry Editor (regedit.exe)
  • go to HKEY_CURRENT_USER\Software\Classes
  • create a new key called 7-zip.gz
  • under 7-zip.gz create another key called shell
  • under shell create another key called any name you like, e.g. extract_tar_gz
  • provide a value for that last key, which is the text that will appear in the context menu of Windows Explorer when you right-click a .gz file. I named mine Extract .tar.gz
  • create another key this time called command
  • the value of this key must be (put all text in one line!!):
    cmd /c @for %%f in ("%1") do ( 
         @7z x -y "%%~ff" -o"%%~dpf" &&  
         @for %%i in ("%%~nf") do ( 
              @if %%~xi==.tar ( 
                   @7z x -y "%%~fi" -o"%%~dpi" && del "%%~fi"
              )
         ) 
    ) 
    && pause
    

the 7-zip.gz registry key hierarchy should now look like this:

Registry key hierarchy for the context menu to extract .tar.gz files

Registry key hierarchy for the context menu to extract .tar.gz files

It is assumed that the command line utility of 7-zip (7z.exe) is available in your PATH. If it isn’t add it.
Of course instead of squeezing the commands of extracting the files one after the other and then deleting the intermediate .tar file, you could write a more elaborate batch file and invoke that to handle the situation and add some error checking too. You could potentially do a similar process for .tar.bz2 files.

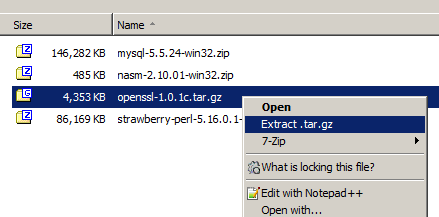
To use it open a Windows Explorer and locate your .tar.gz file, right-click and select the command you added. Mine looks like this:

Context menu that appears on Windows Explorer.

Keep in mind that this command will not clutter your context menu, as it will only appear when you right-click a .gz file. Also note that the script does some basic checking if the .gz file does have a .tar in it, but don’t expect it to be of commercial software quality, it’s just a quick hack!

The command looks cryptic, but the logic is actually extremely simple. Do you want the command explained?


Changelog:

23/07/2014 – Created a .reg file that can be imported into the Windows 7 Registry (use with caution on other OSes)
28/12/2013 – Fixed problem with archives that contained spaces. (thanks to Orinoco for reporting it)

0

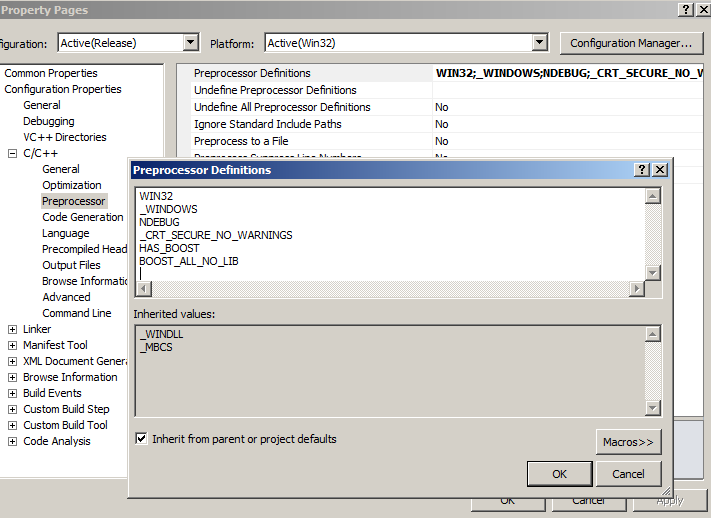
Sometimes the autolinking functionality of Boost on win32 causes trouble. Disabling this is easy, just add to the preprocessor the definition BOOST_ALL_NO_LIB.

I use CMake to build all my projects these days and doing this is very simple, just add:

ADD_DEFINITIONS("-DBOOST_ALL_NO_LIB")

If you want to do this on Visual Studio, go to the properties of the project and add it under Configuration Properties > C/C++ > Preprocessor > Preprocessor Definitions as shown below.

Setting BOOST_ALL_NO_LIB preprocessor definition on Visual Studio

Setting BOOST_ALL_NO_LIB preprocessor definition on Visual Studio

0

[Update: I devised an improved method to create command prompts for Visual Studio 2008, 2010 and 2012 all-in-one.]

I open a command prompt so often that it has become a burden to have to use a stock cmd shortcut and cd to the right directory. It is easy to add an option to the context menu that comes up when you right click a directory on Windows Explorer. I have been experimenting with various methods to easily do this. Here is two of them.

First Method

This uses environment variables from your system to find the necessary VC files necessary. I prefer this method, because the context menu option does not require that you know where Visual Studio 2010 and VS are installed. It is also trivial in that you just execute it from a cmd window and you’re ready to go. I provide here two batch files that you can execute on your system (of course at your own risk!!) to set this up right away:

Below is a brief explanation of what the individual steps in the batch files do. (Do not run these from a command prompt, use a batch file, like those provided above. You are not supposed to run the commands below on a command prompt as variable expansion will mess things up!!)

For 32-bit, we first create the context menu entry, which is what you see on the menu, by executing:

reg add HKEY_CLASSES_ROOT\Directory\shell\VS2010cmd-x86 /ve /f /d "VS2010 x86 Prompt"

Then for the command to be executed when you click on that menu entry, we execute (in one line):

reg add HKEY_CLASSES_ROOT\Directory\shell\VS2010cmd-x86\command 
        /ve /t REG_EXPAND_SZ /f /d "%%comspec%% /V:ON /K 
        """"""%%VS100COMNTOOLS%%VCVarsQueryRegistry.bat"""""" 32bit ^&^& 
        ^!VCINSTALLDIR^!vcvarsall.bat x86 ^&^& cd /d %%1"

Respectively for the 64-bit VS2010 cross compiler tools prompt, first create the context menu entry by executing:

reg add HKEY_CLASSES_ROOT\Directory\shell\VS2010cmd-x64 /ve /f /d "VS2010 x64 Prompt"

Then for the command to be executed when you right-click on that entry, execute (in one line):

reg add HKEY_CLASSES_ROOT\Directory\shell\VS2010cmd-x64\command
        /ve /t REG_EXPAND_SZ /f /d "%%comspec%% /V:ON /K
        """"""%%VS100COMNTOOLS%%VCVarsQueryRegistry.bat"""""" 64bit ^&^&
        ^!VCINSTALLDIR^!vcvarsall.bat x86_amd64 ^&^& cd /d %%1"

One can easily set this up for other versions of Microsoft Visual Studio. For example, you can exchange the VS100COMNTOOLS variable with VS90COMNTOOLS for a prompt to work with Visual Studio 2008.


Second Method

Another, less versatile method is to do the following. This has the limitation that it uses fixed paths, while the first one will work on any system. However with this method you have more control of what happens and you are not bound to use a batch script.

Open the Registry Editor (regedit.exe) add a registry key under:

HKEY_CLASSES_ROOT\Directory\shell

Name it anything (I named mine CommandPrompt) and give it a data value, for example VS2010 Command Prompt, this is the text that will appear in the context menu. Create a new key under this newly create CommandPrompt key and name it command. The value of this key should use vcvarsall.bat of your Visual Studio installation in order for the environment to be set properly when you open the cmd window. The following value for that key does it for my installation:

cmd /k ""D:\dev\msvc2010\VC\vcvarsall.bat"" x86 && cd /d %1

replace D:\dev\msvc2010 with the installation path of your visual studio and you’re done. To find out the right path to the vcvarsall.bat file you can look at the shortcut created by your VS installer. You can also replace x86 (for instance with ia64, amd64, x86_amd64, x86_ia64) to request that another environment is setup if you are cross-compiling for instance.

0

If you have a vast number of files and you want to do something with them, then use something like the following:

grep -l "mystring" * | xargs -I{} echo {}

this will echo each filename that contains mystring in the current working directory. You could replace echo linux command with any other command, for instance with rm -f to remove those files (be careful!). The -I{} switch to xargs prevents having problems with filenames that have spaces. If you want to search in a different directory than the working directory replace * with it.

So lets say you want to find files that contain DNS in /etc. You can do this with:

grep -r -l "DNS" /etc | xargs -I{} echo {}

If you want to find files that contain any form of some string in /home/user. You can do this with:

grep -i -r -l "some string" /home/user | xargs -I{} echo {}

where -i (or –ignore-case) does a case-insensitive search (i.e. it will match any some string, or Some String, etc.) and -r stands for recursive.

If you have a complex scenario where you only want to process specific type of files or file patterns, you may want to use find instead of grep directly.

0