sigmoid

..oo..oo..oo..oo..oo..oo..

When trying to start Buildbot’s master 0.8.6 I encountered this “exceptions.ImportError: cannot import name NoResource” error. The full transcript from the buildbot’s log is shown below:

2012-10-20 21:06:15+0300 [-]  
2012-10-20 21:06:15+0300 [-] Unhandled Error
	Traceback (most recent call last):
	  File "/usr/lib64/python2.7/site-packages/twisted/internet/defer.py", line 551, in _runCallbacks
		current.result = callback(current.result, *args, **kw)
	  File "/usr/lib64/python2.7/site-packages/twisted/internet/defer.py", line 916, in gotResult
		_deferGenerator(g, deferred)
	  File "/usr/lib64/python2.7/site-packages/twisted/internet/defer.py", line 891, in _deferGenerator
		result = g.next()
	  File "/usr/lib64/python2.7/site-packages/buildbot/master.py", line 166, in startService
		self.configFileName)
	---  ---
	  File "/usr/lib64/python2.7/site-packages/buildbot/config.py", line 144, in loadConfig
		exec f in localDict
	  File "/home/buildbot/master/master.cfg", line 307, in 
		from buildbot.status.html import WebStatus
	  File "/usr/lib64/python2.7/site-packages/buildbot/status/html.py", line 20, in 
		from buildbot.status.web.baseweb import WebStatus
	  File "/usr/lib64/python2.7/site-packages/buildbot/status/web/baseweb.py", line 35, in 
		from buildbot.status.web.changes import ChangesResource
	  File "/usr/lib64/python2.7/site-packages/buildbot/status/web/changes.py", line 19, in 
		from twisted.web.error import NoResource
	

2012-10-20 21:06:15+0300 [-] Configuration Errors:
2012-10-20 21:06:15+0300 [-]   error while parsing config file: cannot import name NoResource (traceback in logfile)
2012-10-20 21:06:15+0300 [-] Halting master.
2012-10-20 21:06:15+0300 [-] Main loop terminated.
2012-10-20 21:06:15+0300 [-] Server Shut Down.

This has been fixed in 0.8.7, but if you can’t upgrade to 0.8.7 for whatever reason, see https://github.com/buildbot/buildbot/pull/509 for the explanation and patch. First locate where your python site-packages are (mine as shown below is in /usr/lib64/python2.7/site-packages. You figure this out by executing:

# python -m site

sys.path = [
    '/home/buildbot/master',
    '/usr/lib64/python27.zip',
    '/usr/lib64/python2.7',
    '/usr/lib64/python2.7/plat-linux2',
    '/usr/lib64/python2.7/lib-tk',
    '/usr/lib64/python2.7/lib-old',
    '/usr/lib64/python2.7/lib-dynload',
    '/usr/lib64/python2.7/site-packages',
    '/usr/lib64/python2.7/site-packages/gtk-2.0',
    '/usr/lib64/portage/pym',
]
USER_BASE: '/root/.local' (exists)
USER_SITE: '/root/.local/lib64/python2.7/site-packages' (doesn't exist)
ENABLE_USER_SITE: True

Then, all you have to do is replace:

from twisted.web.error import NoResource

with

try:
    from twisted.web.error import NoResource
except ImportError:
    from twisted.web.error import Error as NoResource

in 3 files:

/usr/lib64/python2.7/site-packages/buildbot/status/web/changes.py
/usr/lib64/python2.7/site-packages/buildbot/status/web/logs.py
/usr/lib64/python2.7/site-packages/buildbot/status/web/slaves.py
0

Marking the 10th birthday of my e-mail server I decided it is time to share with the world my simple solution to sorting the massive amounts of incoming mail, including spam. Over the years I have accumulated a good number of different email accounts that are difficult to track, thus I have setup a central IMAP server where I fetch all mail into and read exclusively what I choose to. I use several methods to fetch and sort mail, but maybe the most useful utility for sorting mail is imapfilter. imapfilter is written in Lua and relies on configuration files written in Lua to process emails. I’m not a Lua expert, but I managed to setup a simple and scalable method for filtering my mail.

I use three types of filter tables that I can add filters to as I see it fit:

  1. pre_filters: filters applied before any other sorting rules. These rules are great for getting rid of abusive mail, spam, or ban any hosts from filling your mailbox.
  2. filters: filters that do the bulk of message processing and sorting.
  3. post_filters: filters applied after all message processing has been completed. This is useful if for instance you decide to get rid of any messages that are marked as spam, but they were not sorted due to any of the previous rules (so they are most likely spam). This also allows you to place messages that matched no rules to special folders, etc.

Filter tables are simple Lua tables, of which every filter is another table that contains the details of that particular filter:

filter_table_name = {
  { filter1 },
  { filter2 },
}

Individual filters are tables with index keys (header, p and moveto):

filter_table_name = {
  { header = "Header_String" , p = "Pattern_String", moveto = account['folder'] },
  { header = "Other_Header_String" , p = "Other_Pattern_String", moveto = account['folder'] },
}

In the order they appear, filters are applied on a table of email messages, e.g. those messages present in the INBOX of an IMAP account. To apply these filters, I wrote a very simple Lua function (see below parseRules) that takes a table of email messages and a table of filters to apply to them. Bear in mind, that to avoid losing any email, I typically just sort unwanted email in the Trash or a Junk folder that I clean up later, either manually or at certain intervals with imapfilter functionality (not shown here).

Putting altogether in an imapfilter configuration file (e.g. ~/.imapfilter/config.lua) it should look similar to the following:

----------------------
--  Global Options  --
----------------------

options.timeout = 120
options.subscribe = true

----------------
--  Accounts  --
----------------
-- For every account create an account entry and check() its status

acc1 = IMAP {
        server = 'collector.server.com',
        username = 'stathis-user',
        password = 'secret',
        ssl = 'ssl3',
}

acc1.INBOX:check_status()

----------------

acc2 = IMAP {
        server = 'imap.gmail.com',
        username = 'stathis-user',
        password = 'secret',
        ssl = 'ssl3',
}

acc2.INBOX:check_status()

----------------

acc3 = IMAP {
        server = 'imap.work.com',
        username = 'stathis-user',
        password = 'secret',
        ssl = 'ssl3',
}

acc3.INBOX:check_status()

----------------

-- select all messages from all INBOXes and construct a single table of messages
results = acc1.INBOX:select_all() + acc2.INBOX:select_all() + acc3.INBOX:select_all()

-----------------
--  Functions  --
-----------------
-- parseRules is used to filter message results using a table of rules (see below)

-- @param res         the table of messages to filter
-- @param ruleTable   the table of rules to match messages against
parseRules = function ( res, ruleTable )
local subresults = {}
  for _,entry in pairs(ruleTable) do
    -- don't use match_field, it downloads part of the msg (slow)
    subresults = res:contain_field(entry["header"], entry["p"])
    if subresults:move_messages( entry["moveto"] ) == false then
      print("Cannot move messages!")
    end
  end
end

---------------
--  Filters  --
---------------

pre_filters = {
  -- Banned IPs typically sending me spam
  { header = "Received" , p = "85.31.186.26", moveto = acc1['Trash'] },
  { header = "Received" , p = "176.251.35.146", moveto = acc1['Trash'] },
}

filters = {
  
  -- Google Alerts
  { header = "From", p = "googlealerts@google.com", moveto = acc1['Misc/Google_Alerts'] },
  
  -- Intel
  { header = "From", p = "isd@intel-dispatch.com", moveto = acc1['Misc/Intel'] },
  { header = "From", p = "@softwaredispatch.intel.com", moveto = acc1['Misc/Intel'] },
  { header = "From", p = "@software-dispatch.intel.com", moveto = acc1['Misc/Intel'] },
  
  -- Boost
  { header = "Sender", p = "@lists.boost.org", moveto = acc1['Mailing_Lists/Boost'] },
  { header = "To", p = "users@lists.boost.org", moveto = acc1['Mailing_Lists/Boost'] },
  
  -- OpenCV
  { header = "Subject", p = "[OpenCV]", moveto = acc1['Mailing_Lists/OpenCV'] },
  { header = "Subject", p = "[OpenCV - Bug #", moveto = acc1['Misc/Bugs/OpenCV'] },
  
}

post_filters = {
  
  -- Any remaining mail having in the subject SPAM? goes in Junk
  { header = "Subject" , p = "[SPAM?] ", moveto = acc1['Junk'] },
  
}

---------------------
--  Parse messages --
---------------------

-- pre filter messages
parseRules(results, pre_filters)

-- sort messages
parseRules(results, filters)

-- post filter messages
parseRules(results, post_filters)

----------------

Software used

0

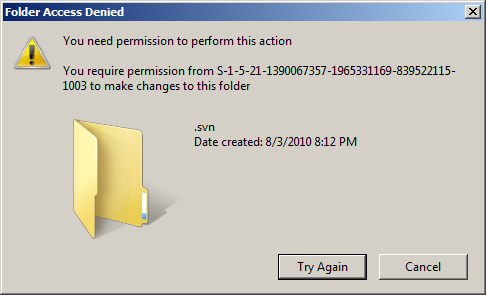
Sometimes when moving from one Windows computer to another with a removable drive or I upgrade an older windows system and reuse a partition from the old system, some files and folders may be inaccessible. Typically, Windows will pop up a window with the message “You need permission to perform this action” and further details of the user that can grant you these permissions. For instance trying to delete a directory will yield a similar window:

Folder Access Denied

Insufficient rights to delete a folder

The steps to take full control of the files again and carry on with the action you were intended to do requires of course Administrator rights. I use this two-step process:

(a) First take ownership of the directory, and its contents (recursively), in question:

takeown /F <dir> /R /D y

(b) Despite being the owner, you also need to have permissions to do what you are intended to do. Best is to allow Administrators full control:

icacls <dir> /grant Administrators:F /T

Right-click > Expropriate > Rinse > Repeat

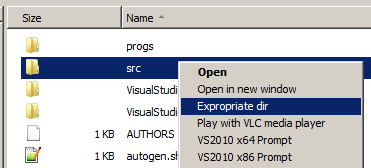
Here is, upfront, the batch file that creates the Expropriate entry in the context menu:

I like to have useful commands available in the context menu when right-clicking a directory. To turn the above two-step process into a right-click menu command, first create the context menu entry by executing from a Windows Command line:

reg add HKEY_CLASSES_ROOT\Directory\shell\Expropriate /ve /f /d "Expropriate dir"

Then for the command to be executed when you click on that entry, execute (all in one line):

reg add HKEY_CLASSES_ROOT\Directory\shell\Expropriate\command 
        /ve /t REG_EXPAND_SZ /f /d "%%comspec%% /c takeown /F %%1 /R /D y &&
        icacls %%1 /grant Administrators:F /T"

The command will be available whenever you right-click a directory from within Windows Explorer, as shown in the figure below.

Expropriate right-click context menu command

Expropriate right-click context menu command, allows you to take ownership and set correct permissions with the click of a button!

You can also download the batch script expropriate-dir-cmd.bat and run it (at your own risk) to create the relevant keys in your registry for the Expropriate command.

0
UPDATE [25 Sep 2013]: Please visit my dedicated page for the ICU Precompiled binaries, build scripts and custom patches! This post is here for historical reasons.

UPDATE [12 Aug 2013]: This post is already a bit old, but the methods described are still valid. You can always find the latest binaries built by myself in the binaries page. Furthermore, I have significantly improved my batch script (build-icu.bat) thanks to many kind people offering tips and suggestions. It supports Visual Studio 2012, selective builds and packaging. Feel free to download it and use as you see fit, but please do not link directly to the script. Link to this page or the binaries pages instead. Thank you.

If you want to build the ICU Libraries from source yourself, you could use either Cygwin/MSVC, like I do, or use the Visual Studio solution included with the sources. Cygwin/MSVC will need to be run several times with various options to get to build the binaries I provide below. Using the Visual Studio Solution is trivial to build the shared ICU library, however it cannot at the time of writing this, produce static libraries, which may be of interest.

Below you can download the pre-built libraries with Cygwin/MSVC for both 32 and 64-bit Windows:

  • icu-50.1.2-shared-vs2010.7z [12.6 MB] [MD5: 4a79e6e3e97f6aa28914065824ca9abc]
  • icu-50.1.2-static-vs2010.7z [25.7 MB] [MD5: a2e417c47d400536ec96d41b0c8b09a7]
  • icu-50.1.2-shared-vs2012.7z [12.9 MB] [MD5: 4ab0534a54590d40fc99d8f422a29bcc]
  • icu-50.1.2-static-vs2012.7z [29.5 MB] [MD5: 7e9d03c1920f67e53e55e74f0c8f60dd]

You will need Cygwin and Microsoft Visual C++. I use Cygwin Portable and 7-zip if you want to create the 7z packages and I use Jem Berkes’ MD5sums 1.2 to generate the md5 checksums for the archives.

I am attaching build-icu.bat the batch script that I wrote to build and package these binaries. Be aware that it isn’t thoroughly tested.

0

Building the FreeGLUT libraries is really trivial with the relatively recent support of CMake, so I’m posting it here only for my own reference to be honest. If you are looking for the pre-built binaries of FreeGLUT see binaries page.


Preparation

Of course you need CMake and Visual Studio, as well as the FreeGLUT source code. I use the SVN trunk:

svn co https://freeglut.svn.sourceforge.net/svnroot/freeglut/trunk/freeglut/freeglut glut-src

FreeGLUT 32-bit

In a VS2010 32-bit command prompt do the following:

cd glut-src
mkdir build
cd build
cmake -G "NMake Makefiles" -DCMAKE_INSTALL_PREFIX=./glut ^
      -DCMAKE_BUILD_TYPE=Debug -DFREEGLUT_BUILD_DEMOS=OFF ../
nmake
nmake install
cmake -G "NMake Makefiles" -DCMAKE_INSTALL_PREFIX=./glut ^
      -DCMAKE_BUILD_TYPE=Release -DFREEGLUT_BUILD_DEMOS=OFF ../
nmake
nmake install

The 32-bit version of FreeGLUT will end up in glut-src\build\glut.

In a VS2010 64-bit command prompt do the following:

mkdir build64
cd build64
cmake -G "NMake Makefiles" -DCMAKE_INSTALL_PREFIX=./glut64 ^
      -DCMAKE_BUILD_TYPE=Debug -DFREEGLUT_BUILD_DEMOS=OFF ../
nmake
nmake install
cmake -G "NMake Makefiles" -DCMAKE_INSTALL_PREFIX=./glut64 ^
      -DCMAKE_BUILD_TYPE=Release -DFREEGLUT_BUILD_DEMOS=OFF ../
nmake
nmake install

The 64-bit version of FreeGLUT will end up in glut-src\build64\glut64.

0